> ## Documentation Index
> Fetch the complete documentation index at: https://bun.ll1025.cn/llms.txt
> Use this file to discover all available pages before exploring further.
# 测试运行器
> Bun 快速、内置、兼容 Jest 的测试运行器,支持 TypeScript、生命周期钩子、模拟和监视模式
Bun 自带一个快速、内置、兼容 Jest 的测试运行器。测试在 Bun 运行时中运行,并支持以下功能。
* TypeScript 和 JSX
* 生命周期钩子
* 快照测试
* UI 和 DOM 测试
* 带 `--watch` 的监视模式
* 通过 `--preload` 预加载脚本
Bun 的目标是与 Jest 兼容,但并非所有功能都已实现。要跟踪兼容性,请参阅[此跟踪问题](https://github.com/oven-sh/bun/issues/1825)。
## 运行测试
```bash terminal icon="terminal" theme={null}
bun test
```
测试使用类似 Jest 的 API 以 JavaScript 或 TypeScript 编写。参见[编写测试](/test/writing-tests)。
```ts math.test.ts icon="https://mintcdn.com/span-inc/82N53aP7NFbaCVSl/icons/typescript.svg?fit=max&auto=format&n=82N53aP7NFbaCVSl&q=85&s=787d39d6a7d96d7f9540dc74344eba23" theme={null}
import { expect, test } from "bun:test";
test("2 + 2", () => {
expect(2 + 2).toBe(4);
});
```
测试运行器会递归搜索工作目录中匹配以下模式的文件:
* `*.test.{js|jsx|ts|tsx|mjs|cjs|mts|cts}`
* `*_test.{js|jsx|ts|tsx|mjs|cjs|mts|cts}`
* `*.spec.{js|jsx|ts|tsx|mjs|cjs|mts|cts}`
* `*_spec.{js|jsx|ts|tsx|mjs|cjs|mts|cts}`
要过滤要运行的*测试文件*集合,请向 `bun test` 传递额外的位置参数。路径匹配任一过滤器的测试文件将被运行。过滤器通常为文件或目录名称;尚不支持 glob 模式。
```bash terminal icon="terminal" theme={null}
bun test ...
```
要按*测试名称*过滤,请使用 `-t`/`--test-name-pattern` 标志。
```sh terminal icon="terminal" theme={null}
# 运行名称中包含 "addition" 的所有测试或测试套件
bun test --test-name-pattern addition
```
要在测试运行器中运行特定文件,请确保路径以 `./` 或 `/` 开头,以便与过滤器名称区分。
```bash terminal icon="terminal" theme={null}
bun test ./test/specific-file.test.ts
```
测试运行器在单个进程中运行所有测试。它加载所有 `--preload` 脚本(参见[生命周期](/test/lifecycle)),然后运行所有测试。如果测试失败,测试运行器将以非零退出码退出。
## CI/CD 集成
`bun test` 支持多种 CI/CD 集成。
### GitHub Actions
`bun test` 自动检测是否在 GitHub Actions 中运行,并直接将 GitHub Actions 注释输出到控制台。
除了在工作流中安装 `bun` 并运行 `bun test` 外,无需任何配置。
#### 如何在 GitHub Actions 工作流中安装 `bun`
要在 GitHub Actions 工作流中使用 `bun test`,请添加以下步骤:
```yaml title=".github/workflows/test.yml" icon="file-code" theme={null}
jobs:
build:
name: build-app
runs-on: ubuntu-latest
steps:
- name: 检出代码
uses: actions/checkout@v4
- name: 安装 bun
uses: oven-sh/setup-bun@v2
- name: 安装依赖 #(假设你的项目有依赖)
run: bun install # 如果你愿意,也可以使用 npm/yarn/pnpm
- name: 运行测试
run: bun test
```
### JUnit XML 报告(GitLab 等)
要生成 JUnit XML 报告,请将 `--reporter=junit` 与 `--reporter-outfile` 一起使用。
```sh terminal icon="terminal" theme={null}
bun test --reporter=junit --reporter-outfile=./bun.xml
```
`bun test` 照常输出到 stdout/stderr,并在运行结束时将 JUnit XML 报告写入指定路径。
JUnit XML 是 CI/CD 管道中报告测试结果的流行格式。
## 超时
使用 `--timeout` 标志指定*每个测试*的超时时间(毫秒)。如果测试超时,将被标记为失败。默认值为 `5000`。
```bash terminal icon="terminal" theme={null}
# 默认值为 5000
bun test --timeout 20
```
## 并发测试执行
默认情况下,Bun 在每个测试文件内顺序运行所有测试。并发执行可并行运行异步测试,从而加速包含独立测试的测试套件。
### `--concurrent` 标志
使用 `--concurrent` 标志可在各自文件中并发运行所有测试:
```sh terminal icon="terminal" theme={null}
bun test --concurrent
```
启用此标志后,所有测试将并行运行,除非标记为 `test.serial`。
### `--max-concurrency` 标志
使用 `--max-concurrency` 标志控制同时运行的最大测试数:
```sh terminal icon="terminal" theme={null}
# 限制为 4 个并发测试
bun test --concurrent --max-concurrency 4
# 默认值:20
bun test --concurrent
```
这有助于防止运行大量并发测试时资源耗尽。默认值为 20。
### `test.concurrent`
即使未使用 `--concurrent` 标志,也可以标记个别测试为并发运行:
```ts title="math.test.ts" icon="https://mintcdn.com/span-inc/82N53aP7NFbaCVSl/icons/typescript.svg?fit=max&auto=format&n=82N53aP7NFbaCVSl&q=85&s=787d39d6a7d96d7f9540dc74344eba23" theme={null}
import { test, expect } from "bun:test";
// 这些测试彼此并行运行
test.concurrent("并发测试 1", async () => {
await fetch("/api/endpoint1");
expect(true).toBe(true);
});
test.concurrent("并发测试 2", async () => {
await fetch("/api/endpoint2");
expect(true).toBe(true);
});
// 此测试顺序运行
test("顺序测试", () => {
expect(1 + 1).toBe(2);
});
```
### `test.serial`
强制测试按顺序运行,即使启用了 `--concurrent` 标志:
```ts title="math.test.ts" icon="https://mintcdn.com/span-inc/82N53aP7NFbaCVSl/icons/typescript.svg?fit=max&auto=format&n=82N53aP7NFbaCVSl&q=85&s=787d39d6a7d96d7f9540dc74344eba23" theme={null}
import { test, expect } from "bun:test";
let sharedState = 0;
// 这些测试必须按顺序运行
test.serial("第一个串行测试", () => {
sharedState = 1;
expect(sharedState).toBe(1);
});
test.serial("第二个串行测试", () => {
// 依赖前一个测试
expect(sharedState).toBe(1);
sharedState = 2;
});
// 如果启用 --concurrent,此测试可以并发运行
test("独立测试", () => {
expect(true).toBe(true);
});
// 链式测试修饰符
test.failing.each([1, 2, 3])("链式修饰符 %d", input => {
expect(input).toBe(0); // 此测试预期每个输入都失败
});
```
## 重试失败的测试
使用 `--retry` 标志自动重试失败的测试最多指定次数。如果测试失败后在下一次尝试中通过,则报告为通过。
```sh terminal icon="terminal" theme={null}
bun test --retry 3
```
每个测试的 `{ retry: N }` 会覆盖全局 `--retry` 值:
```ts theme={null}
// 使用全局 --retry 值
test("使用全局重试", () => {
/* ... */
});
// 用自己的值覆盖 --retry
test("自定义重试", { retry: 1 }, () => {
/* ... */
});
```
你也可以在 `bunfig.toml` 中设置:
```toml title="bunfig.toml" icon="settings" theme={null}
[test]
retry = 3
```
## 重复运行测试
使用 `--rerun-each` 标志多次运行每个测试。这有助于发现不稳定或非确定性的测试失败。
```sh terminal icon="terminal" theme={null}
bun test --rerun-each 100
```
## 随机化测试执行顺序
使用 `--randomize` 标志以随机顺序运行测试。这有助于检测依赖于共享状态或执行顺序的测试。
```sh terminal icon="terminal" theme={null}
bun test --randomize
```
使用 `--randomize` 时,用于随机化的种子会显示在测试摘要中:
```sh terminal icon="terminal" theme={null}
bun test --randomize
```
```txt theme={null}
# ... 测试输出 ...
--seed=12345
2 pass
8 fail
Ran 10 tests across 2 files. [50.00ms]
```
### 使用 `--seed` 实现可重现的随机顺序
使用 `--seed` 标志指定随机化种子,以便在调试顺序相关故障时重现相同的测试顺序。
```sh terminal icon="terminal" theme={null}
# 重现之前的随机化运行
bun test --seed 123456
```
`--seed` 标志隐包含 `--randomize`,因此无需同时指定两者。相同的种子总是产生相同的测试执行顺序。
## 使用 `--bail` 提前终止
使用 `--bail` 标志在指定数量的测试失败后中止测试运行。默认情况下,Bun 运行所有测试并报告所有失败,但在 CI 中,提前停止以减少 CPU 使用率可能更可取。
```sh terminal icon="terminal" theme={null}
# 1 次失败后终止
bun test --bail
# 10 次失败后终止
bun test --bail=10
```
## 监视模式
与 `bun run` 一样,`bun test` 接受 `--watch` 标志来监视文件更改并重新运行测试。
```bash terminal icon="terminal" theme={null}
bun test --watch
```
## 生命周期钩子
Bun 支持以下生命周期钩子:
| 钩子 | 描述 |
| ------------ | ------------ |
| `beforeAll` | 在所有测试之前运行一次。 |
| `beforeEach` | 在每个测试之前运行。 |
| `afterEach` | 在每个测试之后运行。 |
| `afterAll` | 在所有测试之后运行一次。 |
在测试文件中定义钩子,或在通过 `--preload` 标志预加载的单独文件中定义。
```sh terminal icon="terminal" theme={null}
bun test --preload ./setup.ts
```
参见[生命周期](/test/lifecycle)。
## 模拟
使用 `mock` 函数创建模拟函数。
```ts title="math.test.ts" icon="https://mintcdn.com/span-inc/82N53aP7NFbaCVSl/icons/typescript.svg?fit=max&auto=format&n=82N53aP7NFbaCVSl&q=85&s=787d39d6a7d96d7f9540dc74344eba23" theme={null}
import { test, expect, mock } from "bun:test";
const random = mock(() => Math.random());
test("random", () => {
const val = random();
expect(val).toBeGreaterThan(0);
expect(random).toHaveBeenCalled();
expect(random).toHaveBeenCalledTimes(1);
});
```
或者,也可以使用 `jest.fn()`;其行为完全相同。
```ts title="math.test.ts" icon="https://mintcdn.com/span-inc/82N53aP7NFbaCVSl/icons/typescript.svg?fit=max&auto=format&n=82N53aP7NFbaCVSl&q=85&s=787d39d6a7d96d7f9540dc74344eba23" theme={null}
import { test, expect, mock } from "bun:test"; // [!code --]
import { test, expect, jest } from "bun:test"; // [!code ++]
const random = mock(() => Math.random()); // [!code --]
const random = jest.fn(() => Math.random()); // [!code ++]
```
参见[模拟](/test/mocks)。
## 快照测试
`bun test` 支持快照测试。
```ts title="math.test.ts" icon="https://mintcdn.com/span-inc/82N53aP7NFbaCVSl/icons/typescript.svg?fit=max&auto=format&n=82N53aP7NFbaCVSl&q=85&s=787d39d6a7d96d7f9540dc74344eba23" theme={null}
// toMatchSnapshot 的使用示例
import { test, expect } from "bun:test";
test("快照", () => {
expect({ a: 1 }).toMatchSnapshot();
});
```
要更新快照,请使用 `--update-snapshots` 标志。
```sh terminal icon="terminal" theme={null}
bun test --update-snapshots
```
参见[快照](/test/snapshots)。
## UI 和 DOM 测试
Bun 与流行的 UI 测试库兼容:
* [HappyDOM](https://github.com/capricorn86/happy-dom)
* [DOM Testing Library](https://testing-library.com/docs/dom-testing-library/intro/)
* [React Testing Library](https://testing-library.com/docs/react-testing-library/intro)
参见[DOM 测试](/test/dom)。
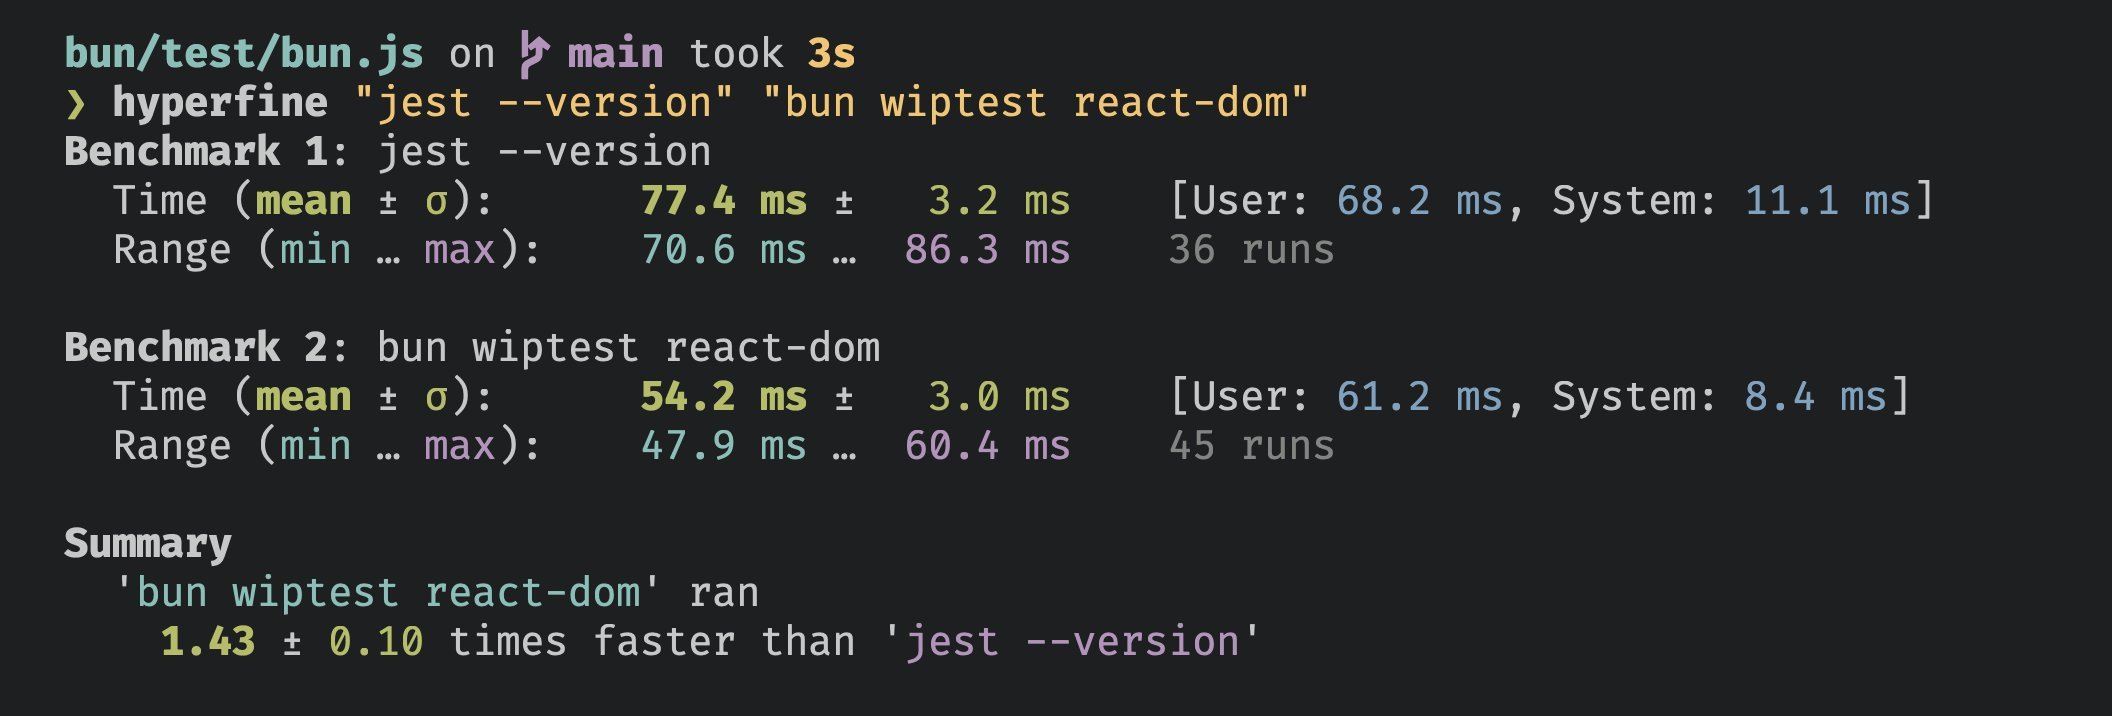
## 性能
Bun 的测试运行器速度很快。
 ## AI Agent 集成
当你使用 Bun 的测试运行器配合 AI 编码助手时,可以启用更简洁的输出,保留失败详情但去掉其余噪音。
### 环境变量
设置以下任一环境变量以启用 AI 友好输出:
* `CLAUDECODE=1` - 用于 Claude Code
* `REPL_ID=1` - 用于 Replit
* `AGENT=1` - 通用 AI Agent 标志
### 行为
当检测到 AI Agent 环境时:
* 仅详细显示测试失败信息
* 隐藏通过、跳过和待办测试指示器
* 摘要统计信息保持不变
```bash terminal icon="terminal" theme={null}
# 示例:为 Claude Code 启用简洁输出
CLAUDECODE=1 bun test
# 仍显示失败和摘要,但隐藏详细的通过测试输出
```
***
# CLI 用法
```bash theme={null}
bun test
```
### 执行控制
设置每个测试的超时时间(毫秒,默认 5000)
每个测试文件重复运行
## AI Agent 集成
当你使用 Bun 的测试运行器配合 AI 编码助手时,可以启用更简洁的输出,保留失败详情但去掉其余噪音。
### 环境变量
设置以下任一环境变量以启用 AI 友好输出:
* `CLAUDECODE=1` - 用于 Claude Code
* `REPL_ID=1` - 用于 Replit
* `AGENT=1` - 通用 AI Agent 标志
### 行为
当检测到 AI Agent 环境时:
* 仅详细显示测试失败信息
* 隐藏通过、跳过和待办测试指示器
* 摘要统计信息保持不变
```bash terminal icon="terminal" theme={null}
# 示例:为 Claude Code 启用简洁输出
CLAUDECODE=1 bun test
# 仍显示失败和摘要,但隐藏详细的通过测试输出
```
***
# CLI 用法
```bash theme={null}
bun test
```
### 执行控制
设置每个测试的超时时间(毫秒,默认 5000)
每个测试文件重复运行 NUMBER 次,以帮助捕获某些错误
失败测试最多重试 NUMBER 次。被每个测试的 {`{ retry: N }`} 覆盖
将所有测试视为 test.concurrent() 测试
以随机顺序运行测试
设置测试随机化的随机种子
在 NUMBER 次失败后退出测试套件。如果不指定数字,默认为 1。
同时执行的最大并发测试数(默认 20)
### 测试过滤
包含标记为 test.todo() 的测试
仅运行名称匹配给定正则表达式的测试。别名:-t
### 报告
测试输出报告器格式。可用:junit(需要 --reporter-outfile)、dots。默认:控制台输出。
报告器格式的输出文件路径(与 --reporter 配合使用)
启用 dots 报告器。--reporter=dots 的简写
### 覆盖率
生成覆盖率分析文档
以 text 和/或 lcov 格式报告覆盖率。默认为 text
覆盖率文件的目录。默认为 coverage
### 快照
更新快照文件。别名:-u
## 示例
运行所有测试文件:
```bash terminal icon="terminal" theme={null}
bun test
```
运行文件名中包含 "foo" 或 "bar" 的所有测试文件:
```bash terminal icon="terminal" theme={null}
bun test foo bar
```
运行所有测试文件,仅包含名称包含 "baz" 的测试:
```bash terminal icon="terminal" theme={null}
bun test --test-name-pattern baz
```